Very often we are so preoccupied with the destination, we forget the journey. We invite you to journey with us... Sign up to connect with Rhythm MP or follow us on facebook.com/MusicJamboree


Music Jamboree 2014

Our annual Music Jamboree was held during the second term school holidays from 16 - 19th September 2014. Music teachers who participated in this year's event were from Malaysia, Sri Lanka and Dubai. For this year, special focus was on music composition in line with our program conducted at two schools since the beginning of the year through our CSR Music Outreach program. Subscribers to our blog would have read the numerous postings done monthly about our program for this year.

During the first day of the Music Jamboree, the theme focused on creative teaching ideas to enhance the student's musical experience during lessons. This was held at J. Y. Klasik, a music centre who graciously provided their facility to host this session.

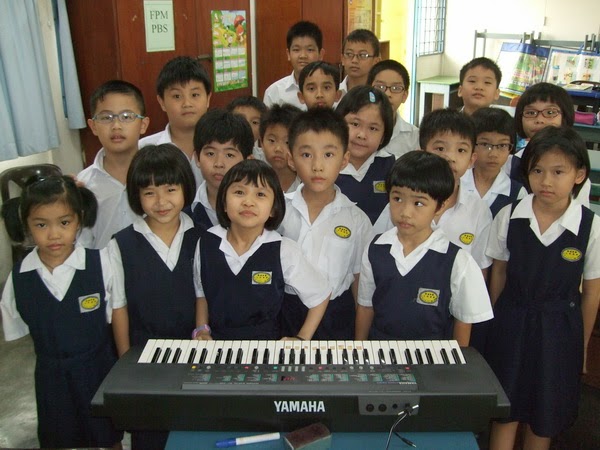
On the second day, a special workshop session was held during the first half of the day on music composition. At this session held at the Penang Chinese Girls Primary School, a small group of five students participated in the workshop to complete a composition each. The purpose of this session was to encourage students to use music theory and the instrumental instruction they have received in a creative manner, which is, to compose music.

Encouraging a music student to compose is a rewarding experience to apply music. The students get to use their creativity to conceptualize their compositions. They were only required to whatever musical knowledge that they have individually acquired up to that point in time. The students were eager and enthusiastic in their attempts and did quite well. One student even added an accompaniment in the form of a piano arrangement to her composition.

Later, during the afternoon session, the teachers received their assignments to prepare for the activities that they will conduct with the many students that they will be meeting during the next two days at the Penang Chinese Girls Primary School.

The third day of the music jamboree, as has always been, is the students music jamboree where primary school students who registered to participate showed up for their music program that involved musical performance in various formats. For this year, the Year 1 - 5 students were from Penang Chinese Girls Primary School, Convent Light Street and Tar Thong Primary School. This session was only for a period of three hours to prepare students to perform the next day.

The students' program was co-planned with Ms. June Loo of the Penang Chinese Girls Primary School. Ms. Loo is the senior music educator of the school and the key person who has been working with us all these years for the students' music jamboree segment. For this year, she participated and led the Year 4 & 5 students in a special performance using the 'angklung' (an ethnic musical instrument made of bamboo).

The music jamboree teachers were all assigned to lead their respective group of students to perform during the final day of the music jamboree. The music jamboree serves to bring new experiences to music teachers and one of the activities we indulge in is to have those who teach music on a 'one to one' basis to step out of their comfort zone to do something they have never done before. Or thought they would never do! That, being to instruct a large group of students to perform.

It was quite a challenge for some of them but nonetheless, they did well as can be seen from the videos of the students' performances that they led.The links to the videos are below at the end of this report.

The entire first half of the day was for the music jamboree teachers to plan their students' performances, to rehearse the students and get them ready to perform on stage at the school hall the following day.

During the second session in the afternoon, the teachers were brought to Evolution Music House, another music centre located at the upmarket Gurney Plaza shopping mall in Penang. There, they met with Ms. Lucy Loo, a composer whose contemporary piano works were published in a series of publications titled "Because Of Love" by Rhythm MP. Those series of books were co-authored together with another composer, Mr. Raymond Tan. Ms. Lucy conducted a hands-on workshop with the teachers and had them perform in an ensemble using the various musical instruments available at the music centre.

The final day on 19th September was the performance day involving the teachers and students under their charge. Here are the videos of the students' performances.

Year 1 & 2 students


Year 3 (Group A)


Year 3 (Group B)


Year 4 & 5 (Group A)


Year 4 & 5 (Group B)


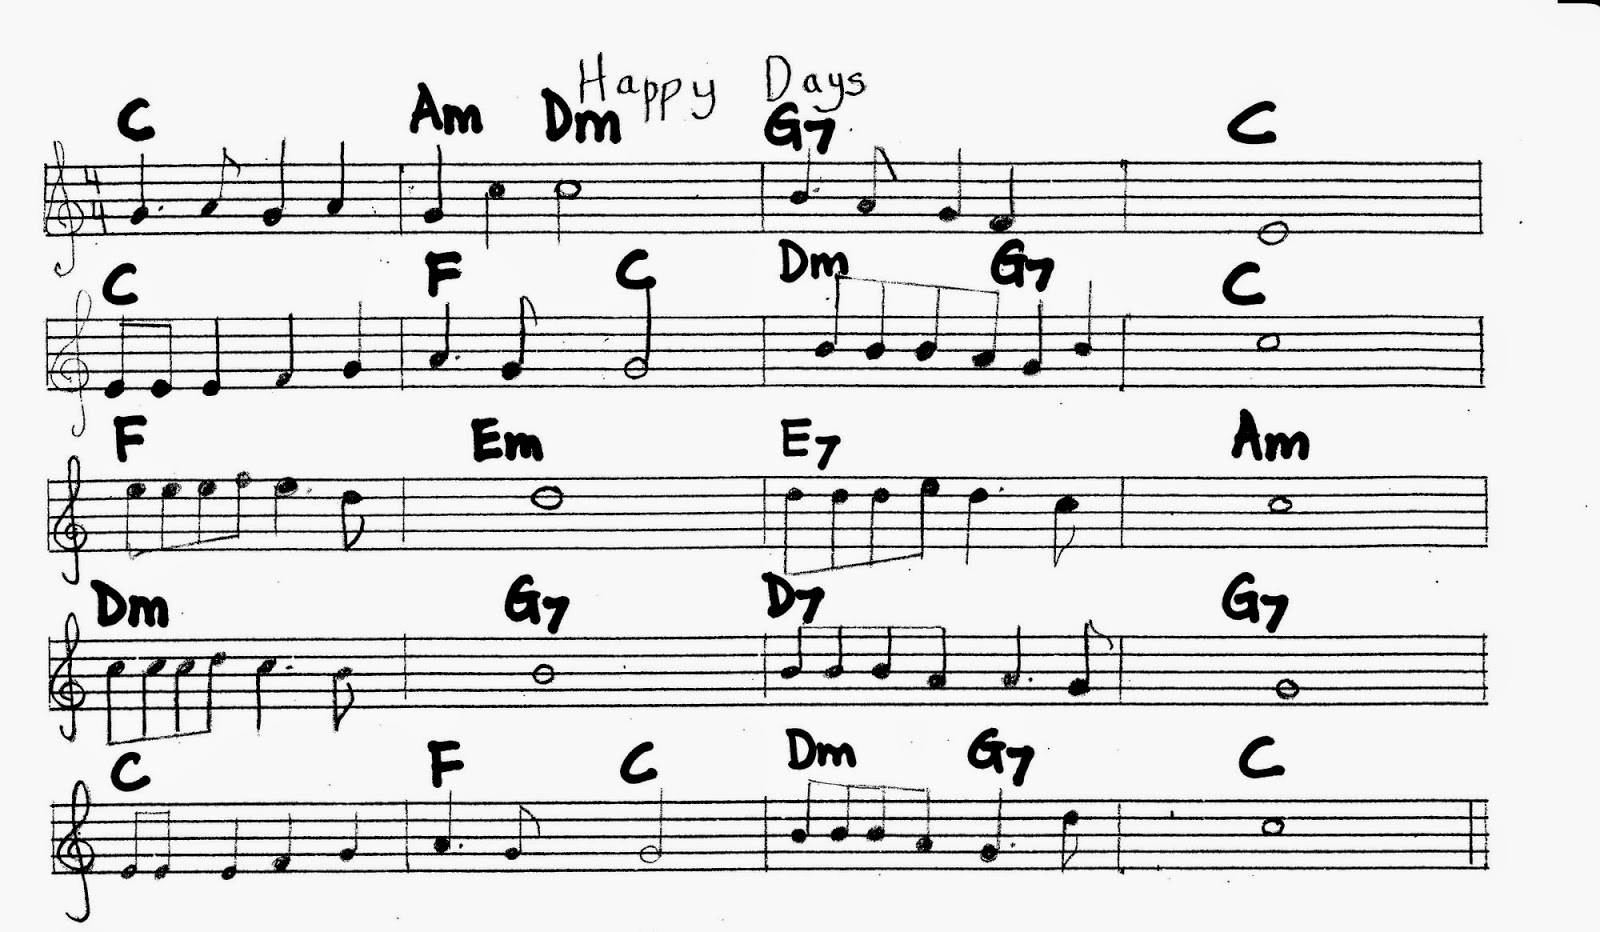
We also featured the top compositions of four students from the Penang Chinese Girls Primary School who participated in a composition project we initiated at the school.It was quite a defining moment for these students to hear their compositions being performed live to an audience of fellow students, teachers and parents. The winning compositions were performed by some members of the Penang Chinese Girls Primary School's recorder ensemble. An added bonus was the recorder ensemble students were so eager that they asked to perform a classical piece titled 'Eine Kliene' by Mozart for the audience.


You can further view all the photos of this year's music jamboree by clicking the link below:


As we look forward to next year's Music Jamboree, we truly appreciate and would like to sincerely thank;
- the music teachers who have participated in this year's program (and hope that you all had an enjoyable time here),
- the Penang Chinese Girls Primary School for hosting the students' part of the music jamboree and for the use of the school's great facilities,
- J. Y. Klasik and Evolution Music House for the use of their premises and facilities,
- Ms. June Loo for your support and advice


CSR Music Outreach Program 2014: Chords make your composition interesting

Recently, we embarked on a composition project for the primary students at the school where we run our music program. It was an assignment for them to do over the first term school break. We encouraged the students to add chords to their compositions, and even going to the extent of doing an arrangement for the piano if they are capable of it. But if they are only able to compose a melody line, I offered to help them add in chords to their composition. As we start to receive some compositions now that school has begun for the second term, I am taking this opportunity to blog about how chords can make a composition sound interesting.

Chords support a melody and does make a song sound good. Quite many old songs are being re-released over the years and to cater to the listener today, those songs have gone through a revamp. The groove is more current and some of those songs go through some re-harmonization. This 'big' word simply means that some of the original chords of the song has been changed and substituted with other chords.

The music appreciation of the listener evolves and progresses through time. Pop songs around the 50's and 60's consist of three basic chords that we refer to as the primary chords. They are Chord I, IV and V7. These chords are most evident in Rock and Roll songs of that era. Nowadays, songs contain more chords to make it sound a lot more interesting.

I shall take a recent composition submitted by a student to illustrate the use of chords and how chords can make the same piece of music sound interesting. The piece (see below) was composed without chords. The story behind the title was that the student was feeling really happy when he composed this piece of music. Thus, the title reflected his mood at that moment when he wrote this piece.


For my first illustration of chord use, I am staying with the use of primary chords only. This piece is written in the key of C Major, therefore the primary chords will be C, F and G7. I am not using Chord V in its most primary form but as a Dominant 7th chord, as shown below.


There are many different chords that are suitable to be used and what I did was simply to change the C chord at Bar 13 to F chord (circled below). Play the above piece at the piano and then the one below to feel the difference in that bar. Both chords sound suitable but it is always a matter of preference for the individual in deciding which chord sounds best.


Taking it another step further, I am using more chords to make the piece sound more interesting. In the example below, I am using chords diatonic to the key of C Major to add to the melody. Play the piece below on the piano and notice the difference as compared to the above. I am sure you will find the use of more chords below more interesting to your ears.


Finally, just to make you aware that more can be done to the harmony (chords) for this piece, I use chords that are not diatonic to the key of C Major. The chords E7 (at bar 11) and D7 (at bar 15) do not belong to the key of C Major but I can use them to great effect for this piece of music. Also, notice that in bars 2, 7 and 19, I use two chords in each bar to add more harmony to the melody. Again, play it on the piano to hear and feel the difference.


Of course, these are just some possibilities of chords that can be used in the same piece of music. There are other possibilities depending on your level of music appreciation and musical knowledge to change the chords around or even add other chords to this piece to make it sound different and interesting. The possibilities are plenty.

When we have received all the compositions, it will be uploaded with arrangements for all to play and recordings for all to hear.

CSR Music Outreach Program 2014: Composing for the young beginner (Part 2)

In Part 1, we have explored notes from a major scale to begin composing your melody. Next is to consider what happens after the first bar. Your melody has to flow continuously and sound good. While some of you can be inspired and continue after composing your first bar of melody, some others may not know how to continue.

Let's go back to my earlier blog posting where I was getting students to begin by creating a one bar rhythmic motif and developing the motif in the second bar. Here is the link: http://musicperformanceappreciation.blogspot.com/2014/04/csr-music-outreach-program-part-5.html

Once the first bar motif is determined, I had the students clap the rhythm to feel what the continuation should be in the second bar. They had to keep clapping and 'feeling' the groove of the motif quite a few times before it impressed upon some students. Soon enough, some were able to clap a continuing rhythm right after the original motif. This was the development that I was waiting for.

At the next lesson, we worked on developing a motif up till four bars. I started the first bar in Simple Triple time as shown below and got the students to suggest the rhythm for the continuing bars.


After which, we began another in Simple Quadruple time and below were the four bars that the we came up with.   


Then came an interesting observation by the students as they clapped the rhythm. They commented that the first four bars were not that interesting as it was repetitious and monotonous. This is when they were made to understand that though the rhythmic phrase is repetitious and sounds uninteresting, it is because no musical pitches/tones were attached to them yet. It began to make musical sense when we began converting the notes into sounds from a scale to turn it into a melody. A few examples were demonstrated for the students to understand the process.

Once musical pitches/tones are attached to these notes, it will definitely not be monotonous or uninteresting anymore. It will be music, as music should be. Of course, the right choices of musical pitch/tone will decide if the melody sounds pleasant or not. As a further illustration, consider the two songs (from the Piano Lessons Made Easy publications) that we are familiar with since our kindergarten days. 


I can safely say that most of us are familiar with the tune of the above pieces. If we remove the musical pitch of the notes in the opening four bars of both songs, you will notice that the types of notes are exactly the same, as shown below. Clap the rhythm of the notes in these four bars and you will feel that it is exactly the same until you hear the music.


The approach to composing for these young students is to begin with a rhythmic motif, developing it to four bars and assigning a music pitch/tone to each note of the rhythm. Of course, there are other ways to begin composing but when these students learn music strictly from a theoretical approach without instrumental studies, it is a lot more tricky. Obviously, composing with instrumental support is most ideal. We hope the process will encourage all the students to take up learning a musical instrument of their choice.

CSR Music Outreach Program 2014: Composing for the young beginner (Part 1)

Young students generally get stumped and find it difficult to start composing. It is always the very first bar that poses numerous problems; what to write, which notes to use, what sounds good, etc. In short, considering too much.

Furthermore, our students are young primary school students who do not have years of formal music learning and music training. In fact, not many even after having learned music for a few years, are really capable of composing music on their own. Those who do are either prompted and carefully guided, or impressed upon.

Firstly, we have to understand what is required in a composition. A composition basically requires a melody (the tune of the song) supported by chords. Chords provide the harmony to support and accompany the melody. One cannot imagine a song today comprising of only melody without chords. 

Our focus here is on melody writing. Chords require much training to understand. To assist the young students to begin composing, here are some pointers to consider. Let's begin by paying attention to the sounds of a scale. In this case, we take the C major scale that most piano methods and theory books begin with. This about getting the very first bar of a composition started.

Normally, the first bar of a composition uses the Chord I of the scale, which is C chord. Let's explore the sounds of notes from the C major scale with C major chord.

Take a look at the C major scale shown below. Notice that the C chord ( C E G) is in the Bass Clef. Play and hold the chord while playing the scale up and down (ascending and descending) . Notice that all the notes sound fine when played in this manner.

  
However, when taking each note individually and playing it with the chord will produce different results. Let's consider which of the notes individually suit the C chord. Obviously, the notes C, E and G that form the C chord sounds the best, as shown below. Play the chord and the three notes individually. The sound of all three notes match the chord perfectly. These notes belong to the C chord and are called chord tones.


Next, let's look at the other notes in the scale. The three notes D, A, B played with the C chord may not sound that ideal. The sound of these three notes do not really match with the C chord. But it does not mean that they create a bad sound. They just have to be used with caution. These notes are termed as non-chord tones as they are not the same notes used in C chord.


The only other note left is F note. I left this note till the end here to demonstrate what is considered a 'bad clash' when playing this F note with the C chord. Try it and you will understand what I mean.


Obviously, F note is to be avoided as the starting note with C chord.

Going back to the chord tones, you would not want to compose your opening bar using just chord tones. It will be quite uninteresting. You should mix chord tones with non-chord tones as in the examples below.  Notice that between the chord tone notes are the non-chord tones. Play these examples and feel how they sound to your ears. Notice that none of the examples begin with the F note.


Below are more examples using a mix of chord tones and non-chord tones.

Let's experiment if using just the non-chord tones to compose your first bar of music would work. Play the examples and you will feel that none of them create a good opening melody. As mentioned above, you would want to use a mix of chord tones and non-chord tones.


Again, leaving the use of the F note till here is to demonstrate the musical pitch of F note that does not suit C chord if you compose your opening bar of melody in the manner below.


To compose music is to create music.

Learning music and learning to play a musical instrument is to study the language of music, to know music, to develop the musical mind and bring forth one's musical creativity. However, learning music is not only about being able to read and play music well.

Composing is one of the most creative processes in music. Some of us can achieve this quite easily while it can be a struggle for others. There are many musically inclined people who never studied music formally but can easily compose music. They do this simply by using their musical mind. They can 'hear' music in their head. Majority of us have musical minds. It is only through personal interest in music or through learning music that we begin to develop our musical mind.

For music students though, to begin composing is not to sit thinking or staring at a piece of manuscript paper hoping that some idea will kick in. I am rather amused when I see students trying to 'think' when attempting to compose music. The idea of 'thinking' in such a situation will be quite unproductive.

In fact, the process should be as simple as 'singing' a short musical idea (motif). Most music students seem to find this method impossible because they are always trying to 'think'. Instead, try to 'hear' a musical line (idea) in your head and hum it out vocally. Everything begins from an idea. Likewise with music. There has to be an opening phrase to get things going. Just go ahead and try out as many musical ideas as you can.

To create the opening phrase may require some effort. Hum out a musical phrase and you may have to do it a few times. Listen intently to it and decide if you like it. If not, try another musical idea until you chance upon one that you like better. Once you have found the opening phrase you prefer, try it a few more times so that you can remember it and to let it inspire you to create a continuing second phrase from this. From here, it goes on in the same manner until you have a complete song.

Listening to lots of music from diverse musical styles is a stimulation to start getting musical ideas. From listening, we get a better appreciation and understanding of musical tones. We also begin to get a 'feel' for phrasings and rhythm in the melody. The rhythm part means using a mixture of music notes (minims, crotchets, quavers, etc) to make our melody interesting.

The opening phrase is not to be a continuous long melody. Everyone who listens to popular music whether it is an instrumental or vocal piece (with lyrics) will note that every song opens with a short to medium phrase. Only classical pieces tend to have much longer and quicker lines, though not all.

A complete song does not have to be a long piece. It can be as little as 12 bars of music up to 48 bars, or even more.

Here are some points to consider:
  • Create a 'catchy' melody that is memorable.
  • Avoid too many repeated notes as it can sound monotonous.
  • Requires a mix of different note types of different note values.
  • Ingenious use of chords can greatly improve the composition.
  • Be adventurous with the range of notes.
  • Be sure that the melody is singable.

CSR Music Outreach Program 2014 Part 7: The Sound Of Music

Yes, the hills are alive with the sound of music, and music is alive everywhere.This blog posting is not about the musical of the same namesake but has more to do with introducing the young students to a musical instrument and hearing musical tones.

Although our program is conducted in a large group comprising young students of different ages and does not focus on any instrumental learning, we encourage the students to learn a musical instrument of their choice privately. Learning music is not about learning music theory alone. A musical instrument must be involved, otherwise, learning music will be dull and uninspiring. The only musical activity we do is for me to play on the keyboard and have students accompany using an assortment of percussion instruments. However, one can only go so far with this activity before boredom sets in. There needs to be variety.

For the purpose of our program, the ideal instruments that are affordable and portable would be the recorder and the pianica (also known as the melodica) as seen in the photos here.

Once any student begins learning to play a musical instrument, the appreciation of and interest in music should automatically catch on. From here on, how fast and how committed the student would be will depend
very much on his/her personal interest.

Playing the pianica is a lot more easy than the recorder, which is much more difficult to control. Blow too hard and the pitch will squeal on the recorder. Learning to control the amount of air requires practice and the students were advised to stand in front of a mirror and observe that they cover all the finger holes. Otherwise, they will take a much longer time to master this basic technique.

For these young chargers, getting them to play the instruments in unison produces quite a commotion. Hearing off pitches makes them holler out and clasping their ears, obviously in protest of hearing something not very musical. At least, they can differentiate between 'bad off pitched noise' and good musical tones. Hopefully, it will be off to a good start for them. I will looking forward to 'an experiment' that I wish to conduct during their next lesson and hope to report some success in the next blog posting.

It just so happens that the school has a 'roll up keyboard' that the students find fascinating when I was unfolding it to be plugged in.


Everyone was eager to try playing this keyboard, so I just let them have a go at it towards the end of the lesson. Of course, it's more of a toy than a real musical instrument.


CSR Music Outreach Program Part 6

Continuing with the four bar rhythmic pattern that students were required to create during their first term school exams, the next step would be to attach musical pitches/sounds to the musical notes of the four bar rhythmic pattern.

The process is actually quite simple.

1. To begin, ask the students to decide on a time signature and create a two bar rhythmic pattern.


2. Ask students to volunteer coming to the whiteboard to write out the two bar rhythmic pattern they have created. In this case, the student chose Simple Triple, which means three crotchet beats in a bar.


3. Next, I ask for any student to volunteer developing the two bar rhythm pattern with another two more bars. But I caution them that this other two bars must have musical connectivity to the earlier two bars. The student (in the photo below) came up with the additional two bars.


4. When all four bars are written on the whiteboard, the next activity is for all the students to clap the four bar rhythm. Ask the students to try their best to 'feel' if the flow feels correct. After clapping the four bar rhythmic pattern a few times, some students noticed that they felt awkward with the rhythm in Bar 3.

5. Rightly so, it does feel a little awkward. Instead of having the students create other rhythmic pattern for Bar 3, I decided on another approach.

6. Getting the students to hear and appreciate musical tones can help them decide better. Musical sounds were then introduced to the students using an electronic keyboard, but only limited to three notes; Middle C, D and E. Include a pitch singing activity using these three notes. I use the syllable 'la' for the singing activity. 

7. I would play short melodic phrases using these three notes and have the entire class 'sing' the phrases exactly as played. It is simply to imitate the pitch they hear.


8. After the singing activity, I would ask students to suggest attaching a pitch to every note of the rhythmic pattern and below is what the students decided. The notes can be randomly chosen because one cannot go wrong with these three notes (C, D and E).


9. Once a pitch is assigned to every note in the rhythm pattern, I proceeded to play the entire melody on the keyboard while the students were asked to listen attentively especially to Bar 3. Quite immediately, the students reacted by saying it did not feel correct, some said it felt 'rushed'.

10. Exploring the somewhat 'adventurous' suggestions given by the students that they are never short of, I simply said the easiest would be for both notes to exchange positions as shown in the photo below.


11. Below is a similar activity done in Simple Quadruple time.


 These approaches are simply ways to encourage students to begin composing music.


CSR Music Outreach Program Part 5

For their recent first term school exams, revision classes were also in order for their music assignment test that is in line with their school exams.

The students are to create a four to eight bar rhythmic phrase using the basic few types of notes they have learned. The purpose is to lead them into composing music. I would not consider any of the young primary school students in my class as being too young to begin composing. In fact, the students actually welcome the opportunity to compose music, though some may find it quite challenging. But the enthusiasm to try their hand at composing is most encouraging.

Here is a simple 'recipe' to begin composing music.

1. Firstly, begin by creating a two bar rhythmic motive. This is the opening musical sentence.

2. Instruct the students to create some contrast between both bars. In this case, the first bar is INACTIVE while the second bar is ACTIVE. It simple means having less notes in the first bar and more notes in the second bar (as shown in the photo). Of course, the notes must all add up to the required beats in each bar according to the time signature.

3. Of course, it can be reversed too. The first bar can be active while the second bar can be less active.

4. The best way to know if the two bar rhythmic motive works, is to clap the rhythm. Lead the entire class to clap the two bar rhythm together. Ask their opinions on how they feel about the rhythmic motive. It is important to communicate with the students to know their thoughts.

5. When the first two bars are completed, proceed with another two bars. Use and follow the same concept of an INACTIVE bar followed by an ACTIVE bar of rhythmic pattern.

6. The student here decided to use quavers in the next two bars (as seen in the photo on the right). This is a good idea as it would create good contrast with the earlier two bars.


7. Joining them together, we now have a four bar rhythmic phrase. Clap the notes of these four bars to 'feel' if it is correct. Do the clapping activity of these four bars a few times and then ask the students for their opinion.

8. Questions that I would ask the students would be; What do you think about the rhythmic flow? Does it feel correct? Is there anything to change? Would you want to change anything?

9. Asking if anyone can improve on it would bring forth an avalanche of ideas from the eager students. Of course, this is encouraged but there must enough lesson time to explore all the students' musical ideas in this case. If not, do this activity at another time.

Here is a clip of the students doing the clapping activity of the four bar rhythm shown in the photo above.


Music Literacy


Literacy is the ability to read and write. In music, every student has to begin by learning the 'language' of music to gain music literacy. Music literacy is the ability to read music (music notes, musical symbols, expression marks, dynamics, etc) and write music (compose and arrange). Music literacy also means the ability to read a music score and perform it on a musical instrument.

My concern here is with those young students who have been learning music for at least two years but still lack the ability to read music well. Some even struggle to read notes slightly beyond an octave above or below Middle C, never mind the notes outside the stave. All resort to counting the spaces and lines of the music stave to figure out the note. They will start from a  note that they are familiar with. I have actually observed a student count from Middle C all the way to the A note above the stave in Treble Clef. This is tedious.

I can only attribute this situation to lack of reading music to play on the instrument. Reading or sight reading music is valuable to improve on note recognition. Reading and playing an assortment of different styles of music does a lot of good.

Young students should develop a pro-active attitude and go hunt for new music to explore on the instrument. Buy those books and start reading and playing on the instrument. Students can ask teachers for their recommendations. Likewise, conscientious teachers would also make certain that their young students are exposed to as much music as possible. Yes, I have also heard and experienced young students who do not practice diligently, taking up to three or four lessons just to play a simple piece correctly. This hinders progress.

What needs to be done to improve reading music notes?

  • Constant exploration of new music to play
  • Sight reading books to help you in reading and recognizing music notes better
  • Keep your eyes on the scores when playing music
  • Do not memorize the music piece until you are sure all the notes are correctly read and played
  • Start composing music according to your level

CSR Music Outreach Program Part 4

Music rudiments and theory is best understood when applied musically. They can be in numerous forms. The most basic to begin with is rhythmic activities. Such activities are firstly, to apply music theory learned and to use them in a musical manner.

At the same time, there are additional musical traits to learn and develop along the way. Having a steady sense of beats/pulse in different tempos is crucial to appreciate and perform music. Imagine listening to a song that has irregular tempo? It would be difficult to enjoy and appreciate the song.

I turned a recent music theory and rhythmic activity into a musical drill game for the students. It is similar to the theory exercises on page 28 of My First Theory Book and is a simple formula.
  1. Create a two or four bar phrase on the board. Include some missing notes in these bars.
  2. Put an asterisk (*) where the missing notes are.
  3. Students are to fill in the missing notes or rests.
  4. Let students take turns coming to the board to do the theory drill games.
  5. The teacher has to create numerous phrases depending on the number of students in the class.
  6. Get creative as well. For example, in place of a missing minim note, instead of putting one asterisk (*), put two asterisks (* *) instead. Obviously, two crotchets are required.
  7. When the students have given all the correct answers to the phrases, conduct the entire class to rhythmically clap each phrase.
  8. It is necessary is to have students know that music must be continuous, beat after beat, from start till end. Each beat must be steady and must not quicken or slow down. Maintaining the beat is not easy for the young students.
  9. Guide the students and clap with them each exercise. Then have the students clap the exercise while you clap a steady pulse for them.

The next rhythmical exercise can be great fun for the entire class. Instead of clapping together for the entire rhythmic phrase, try separating them into two or more groups. Here is the formula for a four bar phrase:
  1. For a start, separate the students into two groups.
  2. Assign each group with the bars they are to clap.
  3. For example, Group A claps Bar 1 & 2. Group B claps Bar 3 & 4.
  4. Inform them that they are to clap the rhythmic phrases in a constant tempo one group after the other continuously.
  5. Set the tempo and count the beats to get them started.
  6. Lead each group through some practices on the bars they are to clap, if they cannot seem to get it together.
  7. If the students are brilliant, then throw a bit of challenge into the activity.
  8. Separate them into four groups each clapping an assigned bar (in the four bar phrase).
  9. Count off a tempo for them to get started. 
  10. If they show they can clap the phrases well, then quicken the tempo or slow it down for variety.
  11. Or, the teacher can create longer phrases up to 8 bars.
  12. Or, create more complicated rhythms with syncopation, dynamics, etc. For example, adding staccatos to some notes and see if the students demonstrate the effect correctly.


CSR Music Outreach Program 2014 Part 3

After learning some basic music rudiments and theory, application is always necessary. Application is the best way to know if the students understood what they have learned. It is also a way to revise and put music theory into practice.

The constant and frequent application of music theory will prepare them for learning instruments and reading music. In keeping with the prepared program, the students are to be capable of creating a 2 or 4 bar rhythmic phrase. The music program involves a little instrument learning when introducing musical tones/pitches. Only theory, group singing and percussion are the focus.

Eventually, the students are to be able to create an 8 bar rhythmic piece by the end of their first school term.

At this recent session, the lesson plan was to engage all the students in music theory drill activity.

Here are the steps taken:

1. Select a student to begin creating a 2 or 4 bar rhythmic pattern on the board.
2. Let the student decide on the time signature.
3. Get the entire class involved by asking them to check if the created rhythm is theoretically correct. If a student spots any mistake, ask that student to point out the mistake. Or, come to the board to make the correction.


 4. Ask this student to pick another schoolmate to come to the board to fill in the counts and clap the rhythm.


5. Next I began counting a constant tempo of 2 bars based on the time signature for the student to begin clapping the rhythm. Meantime, the entire class is obviously paying attention to the activity.

6. When completed, the entire class can be asked if they felt it was correctly done. Let any student point out any mistake. Or, discuss with the class how it was. Questions posed can be like these: Was the tempo constant? Did it flow well from start to end?

7. Next, involve the entire class in clapping the same rhythm.

8. Ask the student to select another schoolmate to begin creating another 2 or 4 bar rhythm pattern. Then, the entire process begins again.

9. Hopefully, as many as possible of the students get to take part in this theory drill activity. Young students like to be up on their feet actively. So, indulge them with learning as well.

Below is a photo of a student creating and filling in the counts of a 4 bar rhythm.


Here is a clip of students clapping the 4 bar rhythm pattern shown in the photo above.

CSR Music Outreach Program 2014 Part 2

Encouraging young students to compose music requires them to understand some basic rudiments of music, simple musical form and a basic scale (usually C Major). Learning basic music rudiments means the student is able to read, understand and write music.

During the recent first lesson, the students learned some basic types of notes (semi breve, dotted minim, minim and crotchets) and time signature (simple duple, simple triple, simple quadruple). Examples of notes that can be used to complete a bar according to the time signature were shown to the students.

Learning to count the beats continuously in a steady pulse was next explained and taught to the students. Following this, the students did some rhythm clapping exercises to fully understand what they have been learning so far.

Try as many one bar examples as possible to let the students see and experience various combinations of notes in a bar that suits the required time signature.

Getting students involved during the lesson is the best way for them to learn and reinforce what they have learned.

Some students were asked to volunteer coming to the whiteboard to fill up one bar with notes that adds up to the required time signature. When done, the entire class was asked to confirm if the written one bar rhythm is correct. If not, the students who spot any mistakes are encouraged to point them out.

Once corrected, all students would then clap and count the rhythm.

Conducting theory drill games when teaching any new rudiments or theory does make lessons more exciting. The drill games will involve the entire class. From the photos shown, two students volunteer to create a one-bar rhythm each. Another student fills in the counts accordingly. The the entire class will clap and count the two bar rhythm as created on the board. Repeating this exercise a few times involving as many students as possible would reinforce what has been taught.
 
If the students seemed competent enough, go on to other time signatures and repeat the drills and exercises.

This is also a start to composing music as well. Composing begins with a melodic motive.

But for the very young beginner students in our program, this is not immediately possible. So, to begin, start working on rhythmic motives. After this, the student needs to experience musical sounds from a scale. Once musical pitch is taught, then a musical melody can be created using the rhythmic motive What the students are going through is a start to be able to compose a simple musical piece by this year end.